Showing posts with label half bathroom. Show all posts

4.19.2014

Half-Bathroom Reveal


It's been a long time comin'!
This little space is not 100% complete, but with the exception of a window treatment, it's ready to be enjoyed.


Months ago, I had to take a long break from my living room projects when our tile installer called on a Friday and asked us if we would be ready for our new floor to begin installation on Monday. We couldn't say no. We had been waiting a year or so to get this situation fixed!  So that weekend, we demolished the bathroom. And by we, I mean my husband and a sawz-all. He rippeth out, I maketh beautiful!

{Just to recap, we had installed new tile 3 years ago, and much to our surprise, about a year after installation the grout started cracking and chipping, and the tiles were coming loose.  That's how this whole process came to start, although we had wanted to renovate this bathroom for some time.}


 So, after dreaming and pinning from inspiring blogs, I created a design board, which I really didn't stray too far from, besides the wall color.


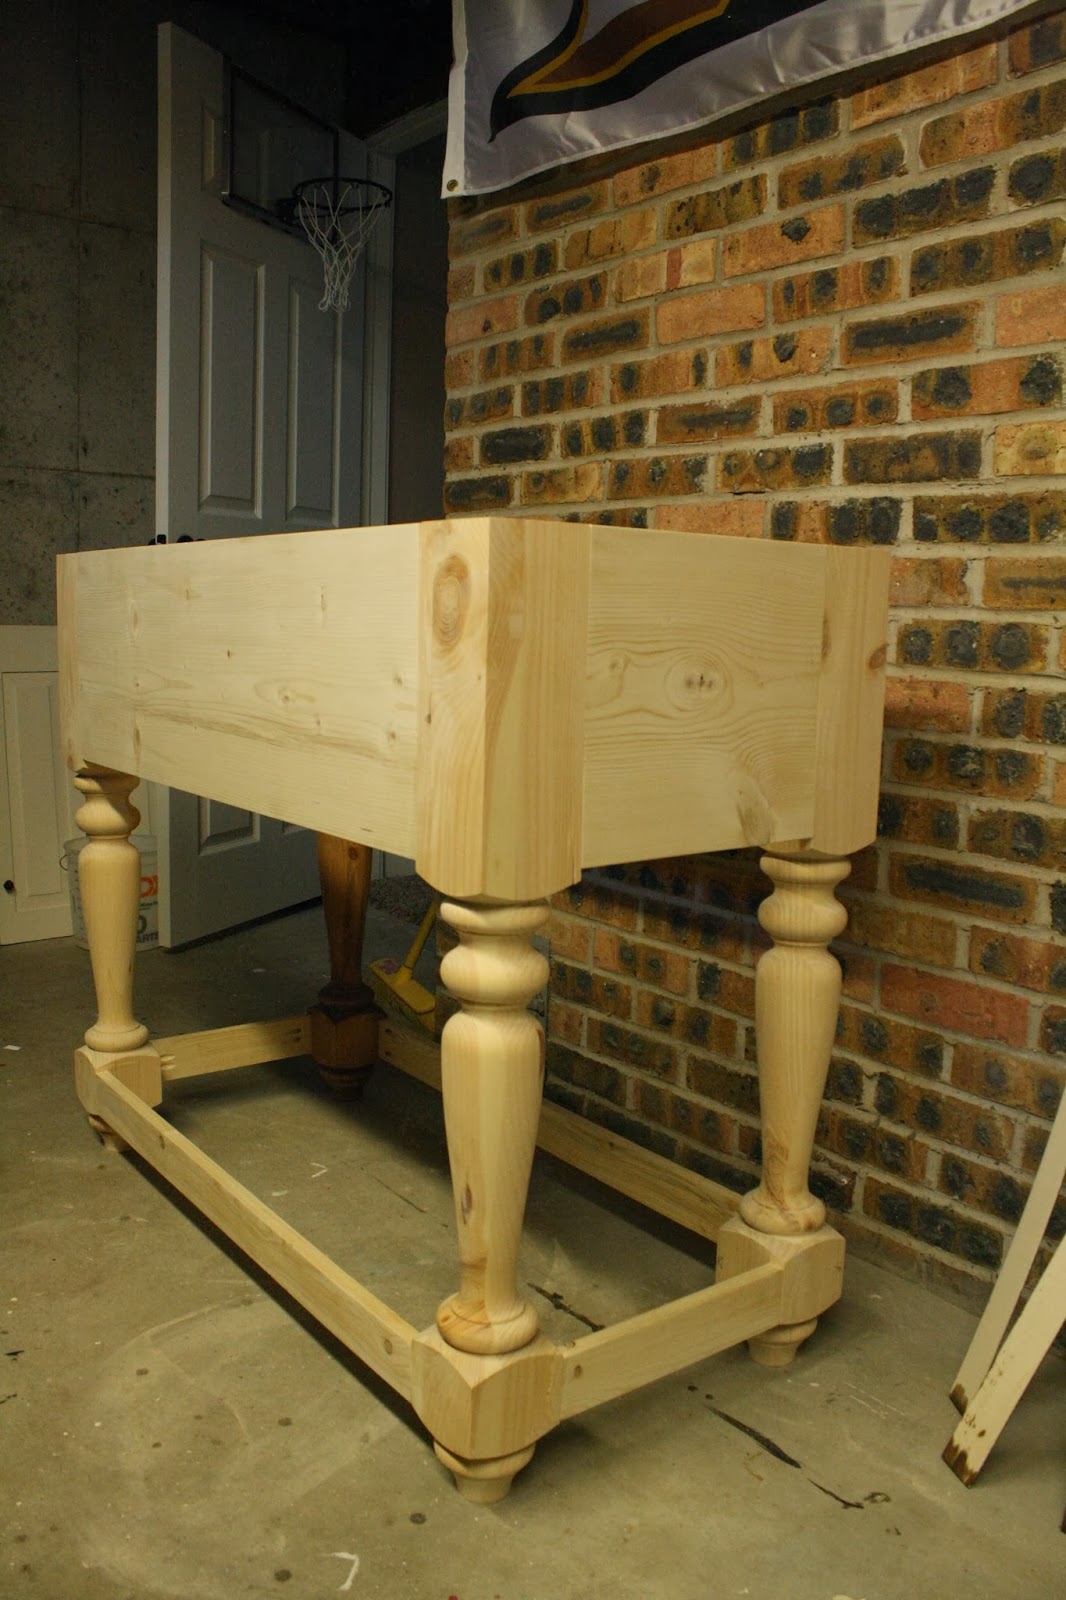
I had a little debacle with ordering the Montaigne Vanity from Home Decorators collection, a piece which I had a crush on for years! It just goes to show, you must always measure twice and cut, er... order once.  But that gave me the chance to try out my new Kreg Jig I got from my husband for Christmas, and build a similar vanity using my own modified version of this vanity from Ana White. Ah, I love new tools! 


I had painted the ceiling a month or so prior to demolition with a free sample of Clark & Kennsington paint I got from Ace Hardware. They used to give those away quite frequently. They should start that up again. ;) Then I painted the upper portion of the walls a different color than what I had specified on my design board. After seeing a photo on Young House Love's site, I decided to go with a darker gray up top; Benjamin Moore's Kendall Charcoal (HC-166), instead of continuing the minty ceiling color onto the walls, as originally planned. I'm happy I did, because the contrast with the planks and the ceiling is refreshing!


 While the new floors were being installed, I got busy planking the walls. Any excuse to use my air compressor, and I'm happy! This process moved quite quickly by myself, but I can't imagine planking a large space, like some inspiring bloggers have done. My biggest challenge was cutting around the window, toilet paper holder, and all of the electrical boxes. Electrical work was something else I also tackled for the first time while working on this bathroom!

Then I primed a couple of coats and painted a few more, and sealed it all off with a coat or two (depending on the area) of Polycrilic.

After the floor and walls were complete, I set the vanity in place and had a template made for the quartz counter tops. And then we waited... 4 weeks. I suppose this would have been the perfect time to get those doors done in the living room, but I didn't. 


I worked on other projects, like renewing the sconces in the bathroom...


 and painting a couple of baskets as storage for the vanity (this is an unseen action shot of how I sometimes get projects done with the boys).


A month had come and gone just like that. Who am I kidding? We were in the dead of winter just trying to survive the Michigan Snowpocalypse of 2014! But we kept busy, and waited patiently. As soon as I got the call that my vanity top was done, I dragged the boys out of bed to pick it up! I saved $80 and installed the counter top myself by applying a bead of silicon adhesive to the vanity, and then caulked the two edged with a waterproof silicon caulk as well. Super easy, since this piece weighs only about 50 pounds.


Then I half-way succeeded to hook up the plumbing myself. I installed the faucet, but I didn't have the right drain pipe (or know-how) to complete that myself. One quick call to our plumber, and the drain was hooked up the next day! Now we can wash our hands ensured that water won't be leaking all over my precious vanity.

After placing the baskets, a sweet little painted pot with a succulent my little guy picked out, and hanging the mirror & a painting my husband and I got in Key West from our wedding/honeymoon, the bathroom is complete. Enjoy some photos while I continue my search for the hand towel that started it all!


And now for everyone's favorite shot, the side by side before and after:


So, what do you think? I love it so much that I'm trying to figure out how to get a mattress to fit. :)

Sources:
Ceiling Color: Benjamin Moore Fresh Dew
Wall Color: Benjamin Moore Kendall Charcoal
Plank Color: Benjamin Moore White Down
Floor Tile: MS International Metro Charcoal @ Home Depot
Vanity: DIY
Baskets: Found at Meijer and Dipped
Countertop: Cotton White Quartz fabricated by Top Of The World
Faucet: Pfister Ashfield in Tuscan Bronze
Sink: Kohler Kelston Undermount in Biscuit

Linking up to:


4.01.2014

DIY "Dipped" Baskets

We've made major progress in the half-bathroom since I last posted. We were waiting on our quartz counter top to be fabricated, which took about three weeks. Once that was ready, I kicked it into high gear, because I was so excited to have the final piece in my hands!
I started accessorizing the bathroom with a couple of big baskets I picked up for under the sink. I searched high and low for these puppies - on the internet, and in just about every store I went to. Then one day while I was grocery shopping at Meijer, and decided to check out their selection. Low and behold, I found these beautiful, deep seagrass baskets for under $17 a piece! Since then I've seen similar baskets for around $25. Of course I couldn't just leave them as is. I decided to tie in the ceiling color, Benjamin Moore's Fresh Dew, by painting the bottom section of these baskets.
First I taped off both baskets of the area I wanted to paint, making sure they were the same. I didn't measure anything, just sort of eye-balled what I thought looked right.
Then I painted them both with regular old flat paint, a free sample from Ace Hardware in fact. I always have bad luck with the tape sticking and pealing paint off of walls, so I made sure that wouldn't happen by removing the tape while the paint was still wet.  And, ta-da! That's all... Easy peasy!
Since I'm impatient, I let them dry for a couple of hours, and placed them in their new home! They'll be used to hold extra toilet paper, the boys' wipes, some Lysol wipes for quick clean up & hand towels... if I ever find what I did with them. I chose the colors for this bathroom from a hand towel that I had from World Market, now I don't know where I put my stack before we demolished this room.  And as you can see from this photo, the sink is hooked up and working great. I love it so much, that I will walk across the house to wash my hands here!
And here's a little sneak peak of the counter top and sink.  That little pot got a quick paint job as well, and a lovely little Donkey Tail succulent Ty picked out at Home Depot last week. Now I'm just waiting on the new toilet paper holder, and I think we're ready for the reveal. Stay tuned! :)

Featured at:
Gorgeous Home Projects

Linking up to:
Just A Girl & Her Blog - Hit Me with Your Best Shot #13
A Bowl Full of Lemons - One Project at a Time
I Heart Nap Time - Link Party Palooza #35
Lolly Jane - Sunday Soiree Link Party
DIY Show Off - That DIY Party
The Golden Sycamore - Inspiration Link Gallery Party

3.10.2014

Half-Bathroom Sconces -- a quick fix!


After a quick & impromptu project, we've decided not to replace our sconces, but to renew them!

I've received a lot of compliments on our $20 Home Depot sonces, and I really liked them too, but the original chrome finish just wasn't working in this new rustic setting. 

Enter: Rustoleum Aged Copper Spray Paint & a mini tutorial!


 Step One: Remove the fixture from the wall.
 Step Two: Lightly sand all exposed metal with a fine sanding block or sand paper. I used a 120 grit sanding block.
 Notice the scuffed up surface. This will allow the spray paint to adhere to the sconce.
 Step Three: Cover sockets with painters tape. Spray away, according to the instructions on your can of course!
 Step Four: Spray additional coats as you see fit. I only had to do two, about an hour apart. I let the sconces dry completely for 48 hours.
Step Five: Re-install your fixtures, step back, and enjoy the beautiful and cheap "new" lights!

This option is way more economical than the $100 I would have spent on new sconces. I've seen other bloggers who have sprayed door knobs with this same product, and they didn't have much luck with it staying, mainly because you're constantly touching knobs. I figure I will probably only have contact with these lights once every couple of years to change a bulb, because let's be honest - the first time I cleaned these was before I sprayed them... yep... that's 3 years of dust. ;)

Sconces Before:
 And after:

The bathroom is really starting to come together now!

Linking Up To:
 Just A Girl And Her Blog - Hit Me With Your Best Shot #10
 I Heart Nap Time - Link Party Palooza #32

3.06.2014

Planking, Priming & Painting

I started planking one wall in the bathroom a couple of weeks ago. It was the quickest one, with long boards, no outlets, switches, lights, windows, etc. Things were moving fast... until I had to start using the jig saw. Seems easy enough, but my blade kept falling out every 15 seconds or so.
 As if that wasn't annoying enough, I ran out of plywood with 4 boards left. I tried to stretch it so that I would have seems behind the vanity (where they wouldn't be seen), but I simply didn't have enough wood. After a quick trip to Home Depot (because it's closer than Lowes), I was back in business... sort of. I had to get a birch plywood instead of pine, and the employee there cut these planks at 6 1/4" instead of 6".  Hmph...
I pushed on, and while it's noticeable, I'm hoping once the mirror and cap molding are up it will still look okay. 

Just to recap, I used the nickle trick to space out the boards, as shown here and here, with a 4' level to guide me and make sure I stayed on track. This project goes really fast if you have a nail gun. They're really fun to use -- you should try it!

Since air compressors aren't the quietest tools, I had to wait until my husband could take the boys somewhere for a few hours a few times so that I didn't wake them up during nap. The first day I was so giddy to start planking that I said to my husband, "If I just put the air compressor in the laundry room while it fills up, it won't wake anyone up!" He just rolled his eyes, and said "You would have killed me if I did that!" when it woke the little guy up... oops!  Sooo it took me a while longer, but the planks are all in place.

Some tips I have if you're planning to plank some walls would be:
 - prime your walls beneath - a few coats! This ensures you won't see any of the previous wall color between the planks.
- when cutting around outlets and switches, be sure to leave access to the screws to remove said outlet/switch. I'm no electrician, but I did change my first switch and outlet while planking (another proud moment! You better believe I tested the wires about 23,958,930 times before touching them! Especially since I was home alone.). I had originally planked over the screws to the switch, which means I had to remove that plank -- what a pain! But I learned to cut BIG holes around these and the wires for the sconces.
- use a 4' level to make sure all of your planks are level.
Other than that, it's pretty straight forward.

Then came the sanding, priming, priming, priming, and painting, painting, painting! Yup, three coats of each! I'm going for a little more of a rustic look if you remember this post, so I didn't quite sand the planks to be perfectly smooth.

I hope you enjoy the sneak peak of my DIY vanity in place with a couple of perfect baskets I found at Meijer of all places, and for less than $20 a piece! They'll be getting a little makeover soon, too.

Next up:
- base boards, cap molding & quarter round in the corners.
- spruce up the baskets a bit
- makeover the existing sconces (since we get a lot of compliments on them)
- quartz counter top (3-4 weeks, people... whoa)
- accessorize

I hooked up the toilet this morning, and I can't tell you how excited M was to use it when he got home from preschool! It's the little things....

Linking Up To:
 Inspiration Link Gallery #74
Inspire Me Please - Linky Party #51 
Share It Link Party #104 

2.21.2014

The New Man in My Life {DIY Vanity for the Half-Bathroom}

You met the new little lady in my life recently, and now it's time to introduce you to the new man in my basement.... Kreg, AKA KregJig.

Ok, so it's not a man (I'm outnumbered as it is!). My awesome husband got it for me as a Christmas gift, and I can't believe I waited almost 2 months to use it! I admit I was nervous, but an unexpected call from the tile installer on a Thursday saying he would be here on Monday to start demolition gave me a kick to get this vanity built over the weekend.

It was quite simple actually. I followed my own modified version of Ana White's plan here, and used this vanity as inspiration. There's no way I was going to attempt doors and drawers on my first piece! Besides, that's not the look I'm going for in the half-bathroom. We don't need that much storage.

I ordered these legs in knotty pine from Osborne Wood Products, and got the rest of my pine pieces from Lowes. My cut list included:

2 - 1"x12" (34" long) - one for the back panel and one for the front panel
2 - 1"x12" (11.5" long) - one for each side panel
2 - 1"x3" (34" long) - back and front support pieces for the shelf
2 - 1"x3" (11.5" long) - side support pieces for the shelf
I used 1/4" plywood planks for the shelf, leftover from plank wall

Pretty straight forward actually. I used my Kreg Jig to drill 3/4" pocket holes in all of these pieces, then I used 1-1/4" Kreg Jig pocket screws. I drilled 2 holes in the shelf supports, and 4 holes in the panels since they will be holding a quartz counter top. If I have to add more support pieces when they come to template, then I'll figure that out.

I attached the side panel and a shelf support piece to a leg, then attached the other leg. I repeated this with the other set of legs. Once I had my sides built, I attached the front and back panels and shelf supports to one set of legs, then to the other. I had to push and hold these pieces into place so that they were lined up correctly. That's when it would have been nice to have another person to help me, but I managed.

That was the hardest part. Then I cut some planks to fit as a shelf, attached those with my nail gun, and my vanity was complete! I put one coat of Driftwood stain on to bring out the gray tones, and two coats of Pecan stain. I let those dry for 24 hours. After they were dry, I put a coat of Polycrylic on and let that dry for 24 hours, then put another coat on. It should be protected now!  If it gets a little banged up by the munchkins of the house, I'm going for a rustic look anyway. ;)

Here she is, just waiting for a top-
Now I just have to finish the planks walls, and we'll be ready to place the vanity and template for counter tops I'm happy with how all of these pieces are coming together, and I'm very excited to install them into the room!

Linking Up To:
I Heart Nap Time
AKA Design + Life 
Tatertots and Jello - Link Party Palooza 
Just a Girl & Her Blog - Be Bold Challenge Link Party 
The Golden Sycamore - Inspiration Gallery Link Party 
Hit Me With Your Best Shot #8
Be Bold Link Party

Featured at:
Tatertots And Jello - Great Ideas - 23 Wood DIY Projects!!
The Woodgrain Cottage - 10 Great Be Bold Ideas

2.20.2014

"Sweet Annie"

Why are a lot of my posts titled with song names? I'm a little corny, I suppose.

But this one is special, because it's more than just the name of a song, it's the name of our new puppy!

Annie is a Cavalier King Charles Spaniel, and she is super sweet! But she's been keeping us a little busier than usual (as if two little boys doesn't keep me busy enough...). I thought for a few days she had this potty training business down, but once it started to snow again and now rain, that went out the window. Her bladder must be the size of a pea...

Anyway, she's also been sleeping with us because I was worried about her yelping waking up our boys. However, I suck at "co-sleeping", that's been confirmed. And the fact that she prefers to sleep on my head doesn't make it any easier. But she's still sweet!

The boys are also in love with her, and she's helped to get us out of this horrible winter rut we seem to be stuck in with record snow fall here in Michigan. 


In house news - the tile in the entry, laundry room and half-bathroom has been ripped out, or should I say taken out by hand, because they were that loose. Most of the tile were just sitting on the underlayment, which is weird. But, new cement board is being installed as I type.

I successfully built the vanity this past weekend. It's stained, polyed (that's not a word...) and ready for a top, as soon as I make up my mind. Well, my mind would be made up if money were no object. Hmph, we'll see.

So, as soon as the tile is installed, we'll place the vanity, template for counter tops, and hopefully have our half-bathroom back in business in about a week! That's not before I finish the plank wall, prime it a few times, paint it a few times and poly it a few more times. Let's hope this coming weekend is productive!

1.24.2014

Half-Bathroom Design Ideas

As I explained here we're planning a complete half-bathroom renovation. With cracking grout and popping tiles, it's time.

When I first saw the Montaigne vanity from Home Decorators, I fell in love! It's clean yet rustic, and offers the perfect storage, in my opinion, for a half-bath. I eyed this guy for over a year, and finally this past Cyber Monday, I ordered it... and then I measured.  This vanity is 22" deep, and we have 19.5" from the wall to the door frame. I frantically called the very next morning to have it refunded and returned (because it had SHIPPED already!!). They actually offered to take a further discount if I would take it, but it simply doesn't fit.
IMG_2672
source
On to plan B.  After searching and searching for a similar vanity, I've decided to build one. Thanks to Ana White, I have a starting point for plans, and a source for legs, which I shared a sneak peak of last week.
48" Turned Leg Vanity
source
I won't be building anymore cabinet doors once I get done with the four I'm working on for our living room built-ins. For me, it's harder than it looks. More on that later...

For now, here's an idea of materials and products we'll be using for our renovation:

I'm still on the hunt for the perfect stain for the vanity, but I plan on something natural looking to accentuate the grain of the knotty pine.

After a trip to Virginia Tile, one of my favorite showrooms for inspiration, I actually found these great tile at Home Depot for under $2/ sq. ft. That's about 1/3 of the price in our quote from the installer. The mirror was a $65 Wayfair purchase, on a whim, that delivered the next day, and was perfect! I actually purchased this same faucet 3 years ago for our master bathroom, but when we installed it, the hole that the water tube goes through (P.S. I'm not a plumber, in case you didn't know...) was too narrow, causing water to literally drip out when turned on all the way. Needless to say, it went back to the store, and we still have our awesome fixture circa 1963 installed... one room at a time!

My plan for the plank walls is to take them about 3/4 of the way up the wall, then carry the wall paint above the planks and on to the ceiling. A fabric window treatment will be what pulls this room together, however I haven't found the right fabric yet. Usually I start with a fabric, but this time around, it might be the final addition to the room.

So that's where we are right now. We still have a couple of months before the tile installer could fit us in, so I've got plenty of time to finish the vanity. ...or start... Wish me luck!

1.15.2014

Our Half-Bathroom - Before

Almost 3 years ago, when we remodeled our kitchen, we decided to remove the red quarry stone floor that was original to our home. It was a difficult color to work with, and no matter how often I cleaned it, it always looked dirty. It ran all the way from our laundry room, half-bathroom and entry, through our living room and dining room, and ended in our kitchen. Quite the span of red!

In our kitchen, dining room and living room we chose a natural hickory hardwood floor that we're still very happy with. In the laundry room, half-bath, and entry we had a 12x12 ceramic installed in an offset pattern. We love the look of it, but about a year after it was installed the grout started coming loose, and tiles were popping. I tried to re-grout them myself, and I even put gorilla glue down as a quick fix, but within days the tiles were loose again. 
We've been told by a couple of tile installers that the installer who put the tile in did not properly prepare the floor underneath, therefore it's bouncing slightly when anyone walks on it, making the grout crack and the tiles pop. Not what we wanted to hear... so we threw a rug over it!
After trying to fix it, and waiting a few years, we're ready to bite the bullet and replace this tile. It is the first thing you see when you come into our house.

But along with replacing it, we've decided it's time to renovate our half-bathroom. As with most half-bathrooms, it probably gets the most traffic in our house. Here's how it currently looks:
I decided to remove the green stripe wall paper about 4 years ago and paint it a purpleish-gray. We also replaced the ornate brass sconces with an economical chrome set from Home Depot. The vanity used to be green to match the wall paper, so I painted it White Down (a Benjamin Moore color) like the rest of our house. Oh, I wish I had a before before picture!
 I'm so excited to begin this renovation, mainly because I'm going to try my hand at some woodworking. A "simple" vanity... don't quote me on that simple. I just received the legs for it today, and while I'm giddy, I'm a bit nervous I might ruin these beautiful stems! Here's a sneak peak:
I'll be back with a design board to check out!